D3D9 Multi-monitor/Lost Device Bugs
While performing additional testing of the maze codes on my new 24-inch LCD monitor (LG W2453V quite nice!); I found that there were two bugs in my code.
Bug#1 – Skinned Character device objects during DestroyDevice/Multi-monitor events
Here we see the value of a good test plan, and a couple more details about the sample framework. How does one test both D3D9 and D3D10? The sample framework enables quite a few “startup” parameters, see DXUT.H, roughly line 744 for the complete list. Here I use 2:
1 –forceapi:[9,10]
2 –forcevsync:[0,1]
This lets us control what API is used at startup time, as well as enabling/disabling sync to vertical refresh. These parameters are applied to the project property page ( right click on the project name in the project window ) under the debugging tab as follows:
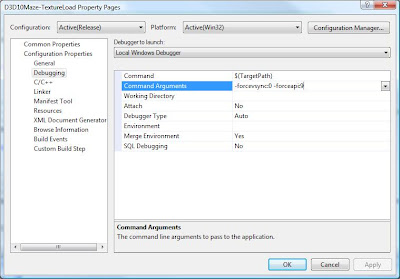
Figure 1 – Example framework command line parameters
So now let’s perform some tests.
When the app goes full screen and back (alt-enter a couple of times) under D3D9 the app works correctly, but on the 2nd time you switch between monitors, the following error crops up:
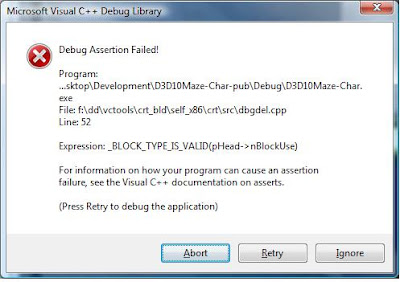
Figure 2– Bug#1 assert
Hmmm…that’s interesting. Evidently we are trying to free a block of memory when it’s still used.
Checking in the debugger, we see that happens on this line:
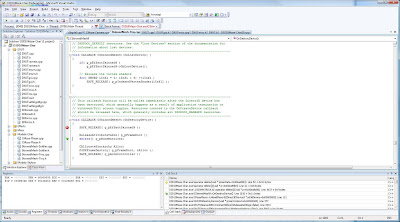
Figure 3– Debugger view
Checking the recent D3D9 skinned character sample code, we see the following 2 lines are now called at app exit time in WinMain in D3D10Maze-TextureLoad.cppp and not at callback DestroyDevice time:
INT WINAPI wWinMain( HINSTANCE, HINSTANCE, LPWSTR, int )
{
…
// Perform any application-level cleanup here. Direct3D device resources are released within the
// appropriate callback functions and therefore don't require any cleanup code here.
ReleaseAttributeTable( g_pFrameRoot );
delete[] g_pBoneMatrices;
}
Ok, ignoring the fact this seems to contradict the comments, let’s make that change and see what happens. It turns out, we only need the delete[] change, as in:
INT WINAPI wWinMain( HINSTANCE, HINSTANCE, LPWSTR, int )
{
…
delete[] g_pBoneMatrices;
}
To make that compile, we need an additional extern around the skinned character variable, e.g.:
CMazePlayer g_SkinnedPlayer;
extern D3DXMATRIXA16* g_pBoneMatrices;
Sure enough, no more debugging assert. And the app still runs clean on the D3D debug runtime with no resource leaks in the debug output. Problem sorted.
Bug#2 – Navigation code during DestroyDevice/Multi-monitor events
The next bug is a little tricky. When the app “starts” and when a “level” or instance of the maze is solved there is a need to reset the navigation code and the mask it maintains for “visited/not-visited” cells. It turns out that here too the full-screen/windowed transition via alt-enter is different than the drag-drop into a different monitor.
What happens? Well, the navigation internals are hosed and the animated character hits the side of the maze, goes all the way down that side, and gets stuck in the corner
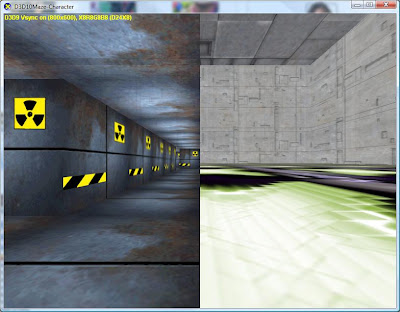
Figure 4– Bug#2 character out of bounds
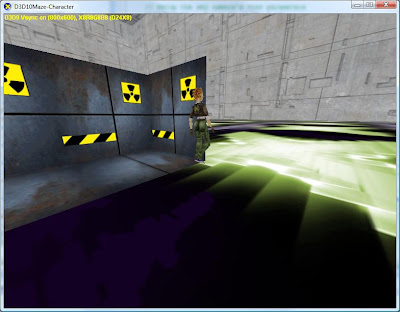
Figure 5– Bug#2 character stuck in the corner
Internal to EngageAutopilot on CMaze-Navigation a Boolean bPrevious was set to not reset the navigation. We move the setting of bPrevious to in the CreateDevice callback as follows:
HRESULT CALLBACK OnD3D10CreateDevice( ID3D10Device* pd3dDevice, const DXGI_SURFACE_DESC* pBackBufferSurfaceDesc,
void* pUserContext )
{
…
bPrevious = FALSE;
StartNavigation();
}
And
HRESULT CALLBACK OnD3D9CreateDevice( IDirect3DDevice9* pd3dDevice, const D3DSURFACE_DESC* pBackBufferSurfaceDesc,
void* pUserContext )
{
…
bPrevious = FALSE;
StartNavigation();
}
That’s all it took, now we correctly reset the autopilot on when the device is fully destroyed and re-created.
The TextureLoad Project
This article and the next several in the series are about making the maze rendering a bit more interesting. The first step in that process is to provide a simulated texture load. How do I do that? Since I am not an artist, I will take the easy way out and use what is generally considered “test art”. I will take our base texture, here:
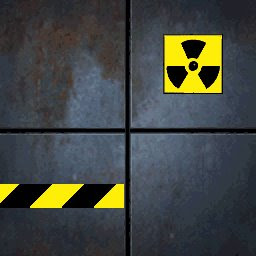
Figure 6– Global level 1 texture
And add a unique integer identifier as text on top of it like this:
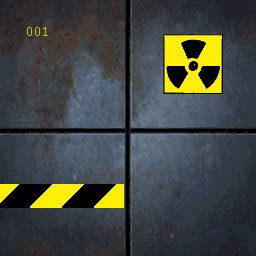
Figure 7– per cell level 1 texture
And I will do that from 1-256, to give us a unique texture for each cell of a 16x16 maze. A maze of that size gives us 256 cells, and how we have a texture for each cell. Since a connected cell can have at most 3 walls, which means the texture can get used for each of them so when the animated character and camera navigate into the cell you will see something like this:
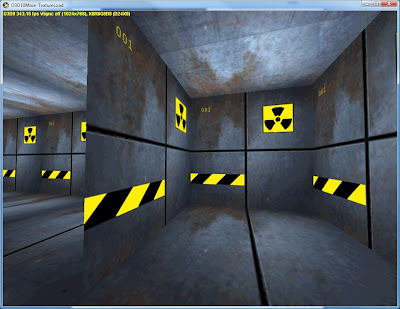
Figure 8– Cell-based maze rendering in cell #1
Each of these textures is 256x256, or 256k. Using 256 of them gives us a simulated texture load of 64m on the card.
However, that’s not all. There are 6 other features of this version of the maze code:
- Multiple “levels” of 256 textures each
- Replacement textures for randomly selected cells, simulating advertisements
- Alpha-blend the roof rendering to give the feel of an expanded world
- Tessellating the maze quads
- Generating “half height” quads so the entire maze grid is visible
- Loading the maze dimensions from a file, so its not hardcoded
Using four levels of 64m mean we are loading 256m of texture on the card. Given the propensity of 512m cards these days, allocating half of 512m or 256m to texture load seems reasonable.
Even with four such levels, after a while the maze rendering will be repetitive. While in the future adding lighting or bump/normal/parallax mapping seems like a reasonable step; for now I will add random replacement textures will make the rendering a little bit different every maze generation step. For the replacement textures I will use images from some of the products and companies I have worked on/for.
To take advantage of the presence of the skybox, we will enable the ability to alpha-blend the roof so from the player camera you can see up through the roof and see the skybox. When in sky camera mode, if alpha-blending is enabled we will still render the roof since we can see down through the roof, but when alpha-blending is off we disable the rendering of the roof to be able to see the contents of the maze.
In the spirit of increasing the workload and not forgetting the vertex pipeline, I will add code to tessellate the wall quads from a 1x1 quad/2 triangle count to a 4x4 16 quad/32 triangle count.
Next we will be able to render in wireframe to be able to visualize the tessellation.
We will also be able to render in “half height’ mode to be able to see across the entire maze grid without having to gain a lot of camera altitude.
And, finally, we will use a maze configuration file to specify the grid dimensions up to 16x16. This allows for faster maze generation and loading during testing.
Here is a screenshot of the updated project:

Figure 9 - Solution Window
We’ll cover the changes in 3 sections: New Pixel Processing, New Vertex Processing,, and Conclusion.
New Pixel Processing
This section has 3 part; Texture Levels, Texture advertisements, and Alpha-blending. Note the keyboard hotkey code goes into the big switch statement in
void CALLBACK OnKeyboard( UINT nChar, bool bKeyDown, bool bAltDown, void* pUserContext )
{
}
Texture Levels
A simple array of textures for both D3D9 and D3D10 will do for our simulated texture levels, in CMaze-Sim.cpp:
ID3D10ShaderResourceView* g_pddsWallSet10[4][256];
LPDIRECT3DTEXTURE9 g_pddsWallSet9[4][256];
At Load time we will iterate and fill these arrays:
D3D10
for ( DWORD i = 0; i < 4; i++)
{
ID3D10ShaderResourceView* temp;
for ( DWORD j = 1; j <= g_nMazeWidth*g_nMazeHeight; j++)
{
switch(i)
{
case 0:
swprintf_s(str,MAX_PATH,L"media\\maze-texture-greymetal\\panel-light-rad-%3.3d-24.bmp",j);
break;
case 1:
swprintf_s(str,MAX_PATH,L"media\\maze-texture-redmixedbrick\\red-bricks-mixed-256x256-%3.3d.bmp",j);
break;
case 2:
swprintf_s(str,MAX_PATH,L"media\\maze-texture-greybrick\\grey-bricks-lighter-256x256-%3.3d.bmp",j);
break;
case 3:
swprintf_s(str,MAX_PATH,L"media\\maze-texture-redlargebrick\\brick-wall-plain-%3.3d.bmp",j);
break;
}
//load texture pressure set
D3DX10CreateShaderResourceViewFromFile( pd3dDevice, str, NULL, NULL, &temp, NULL );
g_pddsWallSet10[i][j-1] = temp;
Sleep(0);
}
}
D3D9
for ( DWORD i = 0; i < 4; i++)
{
LPDIRECT3DTEXTURE9 temp;
for ( DWORD j = 1; j <= g_nMazeWidth*g_nMazeHeight; j++)
{
switch(i)
{
case 0:
swprintf_s(str,MAX_PATH,L"media\\maze-texture-greymetal\\panel-light-rad-%3.3d-24.bmp",j);
break;
case 1:
swprintf_s(str,MAX_PATH,L"media\\maze-texture-redmixedbrick\\red-bricks-mixed-256x256-%3.3d.bmp",j);
break;
case 2:
swprintf_s(str,MAX_PATH,L"media\\maze-texture-greybrick\\grey-bricks-lighter-256x256-%3.3d.bmp",j);
break;
case 3:
swprintf_s(str,MAX_PATH,L"media\\maze-texture-redlargebrick\\brick-wall-plain-%3.3d.bmp",j);
break;
}
//load texture pressure set
D3DXCreateTextureFromFileEx( pd3dDevice, str,
D3DX_DEFAULT, D3DX_DEFAULT,D3DX_DEFAULT,
0, D3DFMT_UNKNOWN, D3DPOOL_MANAGED,
D3DX_DEFAULT, D3DX_DEFAULT, 0,
NULL, NULL, &temp );
g_pddsWallSet9[i][j-1] = temp;
Sleep(0);
}
}
For the curious, I wrote a tool to help with the texture creation that draws the text for the cell-id on the texture at a known location. Available here.
Then at Draw time, we need only modify the wall drawing routine:
D3D10
void DrawByCell10(ID3D10Device* pd3dDevice, UINT x, UINT y,
DWORD g_dwLevel, DWORD n_CellWalls, UINT n_Offset, BYTE id)
{
//texture
g_pDiffuseTex10->SetResource( g_pTextureWallsRV[g_dwLevel] );
pd3dDevice->PSSetShaderResources(0,1,&g_pTextureWallsRV[g_dwLevel]);
pd3dDevice->Draw( n_CellWalls*2*3*(g_dwTesselation*g_dwTesselation), n_Offset*2*3*(g_dwTesselation*g_dwTesselation));
}
void DrawByTexture10(ID3D10Device* pd3dDevice, UINT x, UINT y,
DWORD g_dwLevel, DWORD n_CellWalls,
UINT n_Offset, BYTE id)
{
//texture
if ( g_bAdverts )
{
CellData cell = g_pWorldCells[x][y];
switch( cell.cType )
{
case ADVERT:
g_pDiffuseTex10->SetResource( g_pddsLogoSet10[
cell.dwTID] );
pd3dDevice->PSSetShaderResources( 0, 1,
&g_pddsLogoSet10[cell.dwTID]);
break;
case NORMAL:
g_pDiffuseTex10->SetResource( g_pddsWallSet10[
g_dwLevel][id] );
pd3dDevice->PSSetShaderResources(0, 1,
&g_pddsWallSet10[g_dwLevel][id]);
break;
}
}
else
{
g_pDiffuseTex10->SetResource( g_pddsWallSet10[g_dwLevel][id] );
pd3dDevice->PSSetShaderResources(0,1,
&g_pddsWallSet10[g_dwLevel][id]);
}
//draw
pd3dDevice->Draw( n_CellWalls*2*3*(g_dwTesselation*g_dwTesselation),
n_Offset*2*3*(g_dwTesselation*g_dwTesselation));
}
void CMazeSim::DrawMazeVisNoneWalls10(ID3D10Device* pd3dDevice, double fTime, float fElapsedTime)
{
// Set vertex buffer
UINT stride = sizeof( MazeVertex );
UINT offset = 0;
if ( g_bHalfHeight )
pd3dDevice->IASetVertexBuffers( 0, 1, &g_pMazeWallsHalf10,
&stride, &offset );
else
pd3dDevice->IASetVertexBuffers( 0, 1, &g_pMazeWalls10,
&stride, &offset );
DWORD n_TotalCount = 0;
DWORD n_Offset = 0;
if ( g_bTexArray g_bCells )
{
for ( UINT x = 0; x < y =" 0;" n_cellwalls =" 0;" cell =" g_Maze.GetCellMaskXY(x,y);" id =" g_Maze.GetCellID(x,y);" n_offset =" n_TotalCount;">SetResource( g_pTextureWallsRV[g_dwLevel] );
pd3dDevice->PSSetShaderResources(0,1,
&g_pTextureWallsRV[g_dwLevel]);
pd3dDevice->Draw( g_dwCellWallCount*3*2*
(g_dwTesselation*g_dwTesselation), 0);
}
}
D3D9
void DrawByCell9(IDirect3DDevice9* pd3dDevice, UINT x, UINT y,
DWORD g_dwLevel, DWORD n_CellWalls, UINT n_Offset, BYTE id)
{
HRESULT hr;
//texture
V( g_pEffectMaze9->SetTexture( g_pDiffuseTex9,
g_pTextureWalls[g_dwLevel] ) );
pd3dDevice->DrawPrimitive( D3DPT_TRIANGLELIST, n_Offset*2*3*
(g_dwTesselation*g_dwTesselation),
n_CellWalls*2*(g_dwTesselation*g_dwTesselation));
}
void DrawByTexture9(IDirect3DDevice9* pd3dDevice, UINT x, UINT y,
DWORD g_dwLevel, DWORD n_CellWalls, UINT n_Offset, BYTE id)
{
//texture
if ( g_bAdverts )
{
CellData cell = g_pWorldCells[x][y];
switch( cell.cType )
{
case ADVERT:
pd3dDevice->SetTexture(0,g_pddsLogoSet9[cell.dwTID]);
break;
case NORMAL:
pd3dDevice->SetTexture(0,
g_pddsWallSet9[g_dwLevel][id] );
break;
}
}
else
{
pd3dDevice->SetTexture(0,g_pddsWallSet9[g_dwLevel][id] );
}
//draw
pd3dDevice->DrawPrimitive( D3DPT_TRIANGLELIST, n_Offset*2*3*
(g_dwTesselation*g_dwTesselation),
n_CellWalls*2*(g_dwTesselation*g_dwTesselation));
}
void CMazeSim::DrawMazeVisNoneWalls9(IDirect3DDevice9* pd3dDevice,
double fTime, float fElapsedTime)
{
HRESULT hr;
if ( g_bHalfHeight )
V( pd3dDevice->SetStreamSource( 0, g_pMazeWallsHalf9, 0,
sizeof( MazeVertex ) ) )
else
V( pd3dDevice->SetStreamSource( 0, g_pMazeWalls9, 0,
sizeof( MazeVertex ) ) );
if ( g_bTexArray g_bCells )
{
DWORD n_TotalCount = 0;
DWORD n_Offset = 0;
for ( UINT x = 0; x < y =" 0;" n_cellwalls =" 0;" cell =" g_Maze.GetCellMaskXY(x,y);" id =" g_Maze.GetCellID(x,y);" n_offset =" n_TotalCount;">SetTexture( g_pDiffuseTex9,
g_pTextureWalls[g_dwLevel] ) );
pd3dDevice->DrawPrimitive( D3DPT_TRIANGLELIST, 0,
g_dwCellWallCount*2*(g_dwTesselation*g_dwTesselation));
}
}
And finally we need a way to switch levels. The natural time to do this is when each “level” of the maze is solved. So in CMaze-Navigation.cpp we have:
void SetNextLevel()
{
(g_dwLevel == 3)? g_dwLevel=0:g_dwLevel++;
SetAdvertCells();
ZeroMemory( m_AutopilotVisited, sizeof(m_AutopilotVisited) );
m_AutopilotStack.Empty();
PickAutopilotTarget();
}
I’ll leave it as an exercise for the reader to revisit the locations in PickAutopilotTarget, EngageAutopilot, and DoAutopilot where SetNextLevel is called
That’s it, the maze app now has a simulated texture load of 256m at startup and 64m for each level when the “render textures” or “render cells” keyboard hotkey is pressed. The keyboard hotkey code includes selecting a texture level and selecting per-cell rendering:
case 'T':
g_bTexArray = !g_bTexArray;
break;
case 'C':
g_bCells = !g_bCells;
break;
Here is a screenshot:

Figure 10-Texture Level
Texture Advertisements
We have a set of advertisement textures based on logos and box art of projects I have worked on over the last 15 years:
LPCTSTR g_atszLogoFileNames[] =
{
//sierra-dynamix
L"media\\logos\\logo-sierra.bmp",
L"media\\logos\\logo-sierra-a10-2.bmp",
L"media\\logos\\logo-sierra-es2.bmp",
L"media\\logos\\logo-sierra-Mcs.bmp",
//ms dx team
L"media\\logos\\logo-microsoft.bmp",
L"media\\logos\\logo-dx1.bmp", //same logo for dx2,dx3, there was no dx4
L"media\\logos\\logo-dx5.bmp",
L"media\\logos\\logo-windows95osr2.bmp",
//L"media\\logos\\logo-dx5.bmp", //same logo for dx6
L"media\\logos\\logo-windows98.bmp",
L"media\\logos\\logo-windows98se.bmp",
L"media\\logos\\logo-dx7.bmp",
L"media\\logos\\logo-windows2000.bmp",
L"media\\logos\\logo-dx80.bmp",
L"media\\logos\\logo-dx81.bmp",
L"media\\logos\\logo-dx9.bmp",
L"media\\logos\\logo-windowsxp.bmp",
L"media\\logos\\logo-dx10.bmp",
//ati corporate
L"media\\logos\\logo-ATI.bmp",
L"media\\logos\\logo-ATI 9800 box art.bmp",
L"media\\logos\\logo-ATI TV Wonder 550 box art.bmp",
//ms vs sdk team
L"media\\logos\\logo-vs2005.bmp",
L"media\\logos\\logo-vs2005 sdk.bmp",
//ms fsx team
L"media\\logos\\logo-fsx.bmp",
L"media\\logos\\logo-fsx-acceleration.bmp",
//intel larrabee team
L"media\\logos\\logo-intel.bmp",
L"media\\logos\\logo-larrabee.bmp"
};
#define NUM_LOGOS ( sizeof(g_atszLogoFileNames) / sizeof(g_atszLogoFileNames[0]) )
Next are helpers to manage selecting the advertisement textures, loading them, and releasing them.
void SetAdvertCells()
{
for ( UINT i = 0; i < g_nMazeWidth;i++)
{
for ( UINT j = 0; j< g_nMazeHeight;j++)
{
g_pWorldCells[i][j].dwID =(WORD)i*j;
g_pWorldCells[i][j].wCellX =(WORD)i;
g_pWorldCells[i][j].wCellY =(WORD)j;
dwRand = rand() % (g_nMazeWidth*g_nMazeHeight);
if ( dwRand < NUM_LOGOS+1 && dwRand > 0 )
{
g_pWorldCells[i][j].cType=ADVERT;
g_pWorldCells[i][j].dwTID=dwRand-1;
}
else
g_pWorldCells[i][j].cType=NORMAL;
}
}
}
D3D10
void LoadLogoTextures10(ID3D10Device* pd3dDevice)
{
HRESULT hr;
for(DWORD i=0;i<24;i++)
{
hr = D3DX10CreateShaderResourceViewFromFile( pd3dDevice, g_atszLogoFileNames[i], NULL, NULL, &g_pddsLogoSet10[i], NULL );
}
}
void ReleaseLogoTextures10()
{
for(DWORD i=0;i<24;i++)
{
SAFE_RELEASE (g_pddsLogoSet10[i]);//->Release();
}
}
D3D9
void LoadLogoTextures9(IDirect3DDevice9* pd3dDevice)
{
HRESULT hr;
for(DWORD i=0;i<24;i++)
{
hr = D3DXCreateTextureFromFileEx( pd3dDevice, g_atszLogoFileNames[i],
D3DX_DEFAULT, D3DX_DEFAULT, D3DX_DEFAULT,
0, D3DFMT_UNKNOWN, D3DPOOL_MANAGED,
D3DX_DEFAULT, D3DX_DEFAULT, 0,
NULL, NULL, &g_pddsLogoSet9[i] );
}
}
void ReleaseLogoTextures9()
{
for(DWORD i=0;i<24;i++)
{
SAFE_RELEASE(g_pddsLogoSet9[i]);//->Release();
}
}
We use those within the maze simulation code for initialization and shutdown as follows:
HRESULT CMazeSim::Init10(DWORD dwRandomSeed,
ID3D10Device* pd3dDevice)
{
…
SetAdvertCells();
LoadLogoTextures10(pd3dDevice);
…
}
HRESULT CMazeSim::Init9(DWORD dwRandomSeed,
IDirect3DDevice9* pd3dDevice)
{
…
SetAdvertCells();
LoadLogoTextures9(pd3dDevice)
…
}
HRESULT CMazeSim::Stop10()
{
…
for ( DWORD i = 0; i < j =" 0;">Release();
g_pddsWallSet10[i][j] = 0;
}
}
ReleaseLogoTextures10();
…
}
HRESULT CMazeSim::Stop9()
{
…
for ( DWORD i = 0; i < j =" 0;">Release();
g_pddsWallSet9[i][j] = 0;
}
}
ReleaseLogoTextures9();
…
}
Note the code for releasing the texture level textures as well. And the keyboard hotkey code for controlling adverts is:
case 'V':
g_bAdverts = !g_bAdverts;
break;
Here is a screenshot:
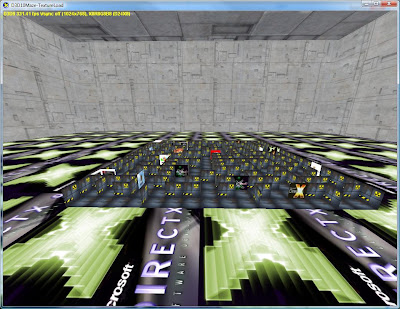
Figure 11 – texture level with advertisements
Alpha-Blending
To alpha-blend the roof, we need to have a technique in the effect file with alpha state.
D3D10
In D3D10, we have 2 states in the effect file, on to turn on an one to turn off alpha-blending
BlendState NoBlending
{
BlendEnable[0] = FALSE;
};
BlendState SrcAlphaBlendingAdd
{
BlendEnable[0] = TRUE;
SrcBlend = ONE;
DestBlend = SRC_COLOR;
BlendOp = ADD;
SrcBlendAlpha = ZERO;
DestBlendAlpha = ZERO;
BlendOpAlpha = ADD;
};
Then we have two techniques for the roof, one that uses those states and one that doesn’t:
technique10 RenderMazeAlpha
{
pass P0
{
SetVertexShader( CompileShader( vs_4_0, VSMazeMain() ) );
SetGeometryShader( NULL );
SetPixelShader( CompileShader( ps_4_0, PSMazeMain() ) );
SetRasterizerState( EnableNoCull );
SetDepthStencilState( EnableDepth, 0 );
SetBlendState(SrcAlphaBlendingAdd,float4( 0.0f, 0.0f, 0.0f, 0.0f ),
0xFFFFFFFF );
}
}
technique10 RenderRoofNoAlpha
{
pass P0
{
SetVertexShader( CompileShader( vs_4_0, VSMazeMain() ) );
SetGeometryShader( NULL );
SetPixelShader( CompileShader( ps_4_0, PSMazeMain() ) );
SetRasterizerState( EnableNoCull );
SetDepthStencilState( EnableDepth, 0 );
}
}
And finally we draw based on which camera and the setting of the alpha-blend hot key as follows
D3D10:
D3DXMATRIX mView,
D3DXMATRIX mWorldViewProj,
double fTime, float fElapsedTime)
{
…
//make roof transparent
else if ( g_bTransparent && g_bSkyCam)
{
g_pRenderMazeAlpha10->GetPassByIndex(0)->Apply(0);
//roof
DrawMazeVisNoneRoof10(pd3dDevice, fTime, fElapsedTime);
}
else if ( g_bTransparent && !g_bSkyCam)
{
g_pRenderMazeAlpha10->GetPassByIndex(0)->Apply(0);
//roof
DrawMazeVisNoneRoof10(pd3dDevice, fTime, fElapsedTime);
}
else if ( !g_bTransparent && g_bSkyCam )
{
g_pRenderRoofNoAlpha10->GetPassByIndex(0)->Apply(0);
//roof – don’t draw here as an optimization
//DrawMazeVisNoneRoof10(pd3dDevice, fTime, fElapsedTime);
}
//make roof solid
else if ( !g_bTransparent && !g_bSkyCam )
{
g_pRenderRoofNoAlpha10->GetPassByIndex(0)->Apply(0);
//roof
DrawMazeVisNoneRoof10(pd3dDevice, fTime, fElapsedTime);
}
else
{
g_pRenderRoofNoAlpha10->GetPassByIndex(0)->Apply(0);
//roof
DrawMazeVisNoneRoof10(pd3dDevice, fTime, fElapsedTime);
}
…
}
D3D9
Here we have a single alpha technique:
technique RenderMazeAlpha
{
pass P0
{
VertexShader = compile vs_2_0 VSMazeMain();
PixelShader = compile ps_2_0 PSMazeMain();
}
}
In D3D9, this is quite simple and the alpha-state is still handled by the fixed function pipeline during rendering as follows:
void CMazeSim::DrawMaze9(IDirect3DDevice9* pd3dDevice,
D3DXMATRIX mView,
D3DXMATRIX mWorldViewProj,
double fTime, float fElapsedTime)
{
…
//make roof transparent if "in the maze" else dont render
if ( g_bTransparent && g_bSkyCam )
{
pd3dDevice->SetRenderState( D3DRS_ALPHABLENDENABLE, TRUE );
pd3dDevice->SetRenderState( D3DRS_SRCBLEND,
D3DBLEND_ONE);
pd3dDevice->SetRenderState( D3DRS_DESTBLEND,
D3DBLEND_SRCCOLOR);
pd3dDevice->SetRenderState( D3DRS_CULLMODE, D3DCULL_NONE );
V( g_pEffectMaze9->SetTexture( g_pDiffuseTex9,
g_pTextureRoof[g_dwLevel] ) );
V( g_pEffectMaze9->SetMatrix( g_hmMazeWorldViewProjHandle9,
&mWorldViewProj ) );
V( g_pEffectMaze9->Begin( &cPass, 0 ) );
V( g_pEffectMaze9->BeginPass( 0 ) );
DrawMazeVisNoneRoof9(pd3dDevice, fTime, fElapsedTime);
V( g_pEffectMaze9->EndPass() );
V( g_pEffectMaze9->End() );
}
else if ( g_bTransparent && !g_bSkyCam)
{
pd3dDevice->SetRenderState( D3DRS_ALPHABLENDENABLE, TRUE );
pd3dDevice->SetRenderState( D3DRS_SRCBLEND,
D3DBLEND_ONE);
pd3dDevice->SetRenderState( D3DRS_DESTBLEND,
D3DBLEND_SRCCOLOR);
pd3dDevice->SetRenderState( D3DRS_CULLMODE, D3DCULL_NONE );
V( g_pEffectMaze9->SetTexture( g_pDiffuseTex9,
g_pTextureRoof[g_dwLevel] ) );
V( g_pEffectMaze9->SetMatrix( g_hmMazeWorldViewProjHandle9,
&mWorldViewProj ) );
V( g_pEffectMaze9->Begin( &cPass, 0 ) );
V( g_pEffectMaze9->BeginPass( 0 ) );
DrawMazeVisNoneRoof9(pd3dDevice, fTime, fElapsedTime);
V( g_pEffectMaze9->EndPass() );
V( g_pEffectMaze9->End() );
}
else if ( !g_bTransparent && g_bSkyCam ) //don’t draw
{
pd3dDevice->SetRenderState( D3DRS_ALPHABLENDENABLE, FALSE );
pd3dDevice->SetRenderState( D3DRS_CULLMODE, D3DCULL_NONE );
V( g_pEffectMaze9->SetTexture( g_pDiffuseTex9,
g_pTextureRoof[g_dwLevel] ) );
V( g_pEffectMaze9->SetMatrix( g_hmMazeWorldViewProjHandle9,
&mWorldViewProj ) );
V( g_pEffectMaze9->Begin( &cPass, 0 ) );
V( g_pEffectMaze9->BeginPass( 0 ) );
//DrawMazeVisNoneRoof9(pd3dDevice, fTime, fElapsedTime);
V( g_pEffectMaze9->EndPass() );
V( g_pEffectMaze9->End() );
}
else if ( !g_bTransparent && !g_bSkyCam )
{
pd3dDevice->SetRenderState( D3DRS_ALPHABLENDENABLE, FALSE );
pd3dDevice->SetRenderState( D3DRS_CULLMODE, D3DCULL_NONE );
V( g_pEffectMaze9->SetTexture( g_pDiffuseTex9,
g_pTextureRoof[g_dwLevel] ) );
V( g_pEffectMaze9->SetMatrix( g_hmMazeWorldViewProjHandle9,
&mWorldViewProj ) );
V( g_pEffectMaze9->Begin( &cPass, 0 ) );
V( g_pEffectMaze9->BeginPass( 0 ) );
DrawMazeVisNoneRoof9(pd3dDevice, fTime, fElapsedTime);
V( g_pEffectMaze9->EndPass() );
V( g_pEffectMaze9->End() );
}
//reset state
{
pd3dDevice->SetRenderState( D3DRS_ALPHABLENDENABLE, FALSE );
pd3dDevice->SetRenderState( D3DRS_CULLMODE, D3DCULL_CCW );
pd3dDevice->SetRenderState( D3DRS_FILLMODE, D3DFILL_SOLID );
}
…
}
The keyboard hotkey code for controlling alpha-blending is:
case 'B':
g_bTransparent = !g_bTransparent;
break;
Here is a screenshot:
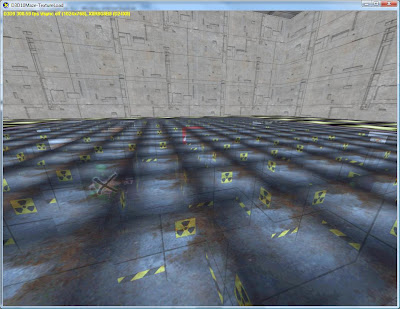
Figure 12 – Alpha-blending
New Vertex Processing
This section has 4 parts; Tessellation, Wireframe, Half-Height, and Maze dimensions Loading.
Tessellation
We have already seen the core of the tessellation code, LoadNonIndexedQuad. LoadNonIndexedQuad walks across and down a quad and subdivides it according to the tessellation level and calculates vertex locations and texture coordinates:
void CMazeSim::LoadNonIndexedQuad( MazeVertex* vertices,
const D3DXVECTOR3& vOrigin, const D3DXVECTOR3& vBasis1,
const D3DXVECTOR3& vBasis2, const D3DXVECTOR3& vNormal )
{
// Compute edge steps
float fStep = 1.0f / g_dwTesselation;
D3DXVECTOR3 vStep1 = vBasis1 * fStep;
D3DXVECTOR3 vStep2 = vBasis2 * fStep;
// Fill out grid of vertices
D3DXVECTOR3 rowstart = vOrigin;
float u = 1;
for( DWORD i = 0; i < pos =" rowstart;" v =" 0;" j =" 0;">pos = pos;
vertices->tex.x = u;
vertices->tex.y = v;
vertices++;
//t1v2
vertices->pos = pos+vStep2;
vertices->tex.x = u;
vertices->tex.y = v+fStep;
vertices++;
//t1v3
vertices->pos = pos+vStep1;
vertices->tex.x = u-fStep;
vertices->tex.y = v;
vertices++;
//t2v1
vertices->pos = pos+vStep2;
vertices->tex.x = u;
vertices->tex.y = v+fStep;
vertices++;
//t2v2
vertices->pos = pos+vStep2+vStep1;
vertices->tex.x = u-fStep;
vertices->tex.y = v+fStep;
vertices++;
//t2v3
vertices->pos = pos+vStep1;
vertices->tex.x = u-fStep;
vertices->tex.y = v;
vertices++;
}
}
}
We then need code to regenerate the vertex data based on the keyboard hotkey, and the keyboard hotkey code. The regeneration code reuses the existing vertex destruction/creation code as follows:
case '+':
case VK_ADD:
case VK_OEM_PLUS:
g_dwTesselation++;
if ( g_dwTesselation > g_dwMaxTess )
g_dwTesselation = g_dwMaxTess;
if (!DXUTIsCurrentDeviceD3D9() )
{
g_MazeSim.FreeMazeVertices10();
g_MazeSim.LoadMazeVertices10(DXUTGetD3D10Device());
}
else
{
g_MazeSim.FreeMazeVertices9();
g_MazeSim.LoadMazeVertices9(DXUTGetD3D9Device());
}
break;
case '-':
case VK_SUBTRACT:
case VK_OEM_MINUS:
g_dwTesselation--;
if ( g_dwTesselation <1 )
g_dwTesselation = 1;
if (!DXUTIsCurrentDeviceD3D9() )
{
g_MazeSim.FreeMazeVertices10();
g_MazeSim.LoadMazeVertices10(DXUTGetD3D10Device());
}
else
{
g_MazeSim.FreeMazeVertices9();
g_MazeSim.LoadMazeVertices9(DXUTGetD3D9Device());
}
break;
To increment and decrement the tessellation count between 1 and 4.
Wireframe
Wireframe rendering is similar to alpha-blending in that it requires cooperation between the effect file and the rendering.
D3D10
D3D10 captures the state in the effect file, with no fixed function code required:
RasterizerState EnableWireframe
{
Fillmode = WIREFRAME;
CullMode = NONE;
};
RasterizerState EnableSolid
{
Fillmode = SOLID;
CullMode = BACK;
};
technique10 RenderMazeWireframe
{
pass P0
{
SetVertexShader( CompileShader( vs_4_0, VSMazeMain() ) );
SetGeometryShader( NULL );
SetPixelShader( CompileShader( ps_4_0, PSMazeMain() ) );
SetRasterizerState( EnableWireframe );
SetDepthStencilState( EnableDepth, 0 );
SetBlendState( NoBlending, float4( 0.0f, 0.0f, 0.0f, 0.0f ),
}
}
void CMazeSim::DrawMaze10(ID3D10Device* pd3dDevice,
D3DXMATRIX mView,
D3DXMATRIX mWorldViewProj,
double fTime, float fElapsedTime)
{
…
//opaque pass
if ( g_bWireframe )
g_pRenderMazeWireframe10->GetPassByIndex(0)->Apply(0);
else
g_pRenderMazeSolid10->GetPassByIndex(0)->Apply(0);
…
//make roof wireframe
if ( g_bWireframe )
{
g_pRenderMazeWireframe10->GetPassByIndex(0)->Apply(0);
//roof
DrawMazeVisNoneRoof10(pd3dDevice, fTime, fElapsedTime);
}
…
}
D3D9
void CMazeSim::DrawMaze9(IDirect3DDevice9* pd3dDevice,
D3DXMATRIX mView,
D3DXMATRIX mWorldViewProj,
double fTime, float fElapsedTime)
{
…
if ( g_bWireframe )
pd3dDevice->SetRenderState( D3DRS_FILLMODE, D3DFILL_WIREFRAME );
…
pd3dDevice->SetRenderState( D3DRS_FILLMODE, D3DFILL_SOLID );
…
}
And now we have wireframe when we use the correct hotkey as follows:
case 'F':
g_bWireframe = !g_bWireframe;
break;
Here is a screenshot of the tessellation and wireframe code: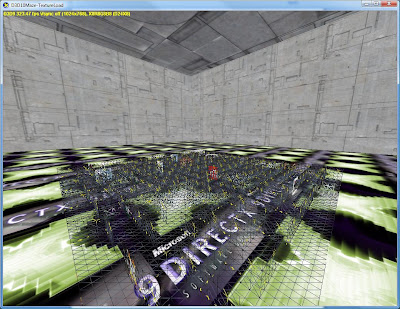
Figure 13 – Tessellation and Wireframe
Half-Height
Half height rendering is easy; we just carry around an extra set of vertex buffer variables and pre-generate the maze vertex buffers with half the y altitude. I’ll let you search for that code in the project since it’s not quite as interesting.
The keyboard hotkey code is as follows:
case 'H':
g_bHalfHeight = !g_bHalfHeight;
break;
Here is a screenshot: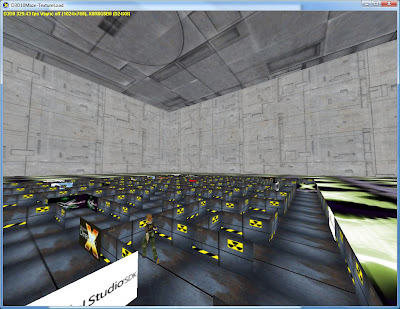
Figure 14-Half Height
The last feature is the idea of loading the maze dimensions out of a file. It’s quite simple code, but gives a level of flexibility especially for testing new features.
void InitMazeSize()
{
//read maze size
FILE* f;
fopen_s(&f,"maze.cfg","rb");
fscanf_s(f,"%d",&g_nMazeSize);
g_nMazeWidth = g_nMazeHeight = g_nMazeSize;
g_nMazeCells = g_nMazeSize * g_nMazeSize;
fclose(f);
}
And we use it here
int WINAPI wWinMain( HINSTANCE hInstance, HINSTANCE hPrevInstance, LPWSTR lpCmdLine, int nCmdShow )
{
…
// Perform any application-level initialization here
InitMazeSize();
…
}
Conclusion
With that, we are done. And still in the month of June, as promised. Because all of this functionality is encapsulated within the CMazeApp class and file CMaze-Sim.cpp there is almost no impact outside of that module. And because we examined the keyboard handling code for each feature, there is no real reason to examine the OnKeyboard method.
Here is a movie showing some of these features in action.
This sample builds on the previous ones. Now we have a skybox rendering, a maze generating and rendering, a simple solver for the maze, camera controls, skinned characters, UI controls, and various texturing and vertex features for the maze rendering.
Here is a link to the project with full source Note the texture sets are delivered as separate downloads since MediaFire limits me to 100m per file. Unzip them in the media folder.
Here is a link to a Word document for better formatting.
Next up in the series are:
1)generating a new maze with new start/stop locations when the current one is fully solved, and
2)rendering an animated flag for the start and “solved” positions in the maze, let’s call them the goals.
After that, who knows? Perhaps rendering a 2D map of the maze as part of an enhanced HUD, perhaps rendering some objects in the rooms (cells) in the maze, and then we will see.

 Posts
Posts
0 comments: